Today I will give you an insight to our up and coming project, called “Girl With The Broken Heart” which I am really excited about.
It is one of these cases when despite advanced prep work, the whole venture had to be put on hold…
The Storeyboard and other drafted elements were sitting in the drawer for over two years, but today we are up and running.
And it looks like nothing can stop us!
So what is happening with the project at the moment?
Well… “Girl With The Broken Heart” is a Fantasy tale about an aching girl with a mysterious wizardry ancestors…
The girl possess powers she is not aware of and one of them is ability to harness the fire…
I think you are getting the picture, so let’s get back to photography!
…
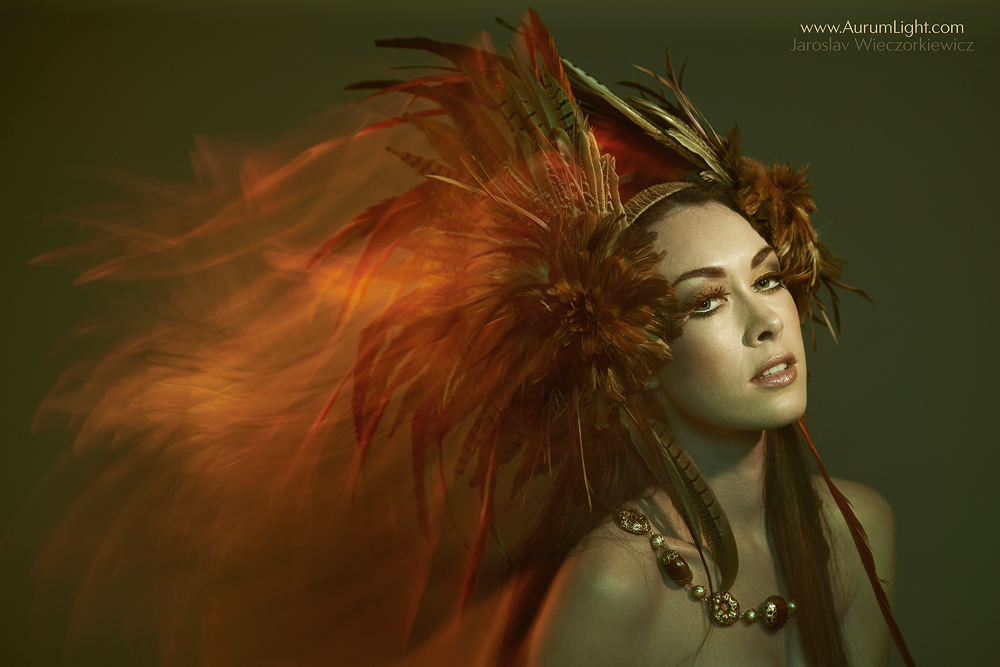
Our goal is to achieve the fiery effect, without use of Photoshop and without the need of exposing our model to the real flames.
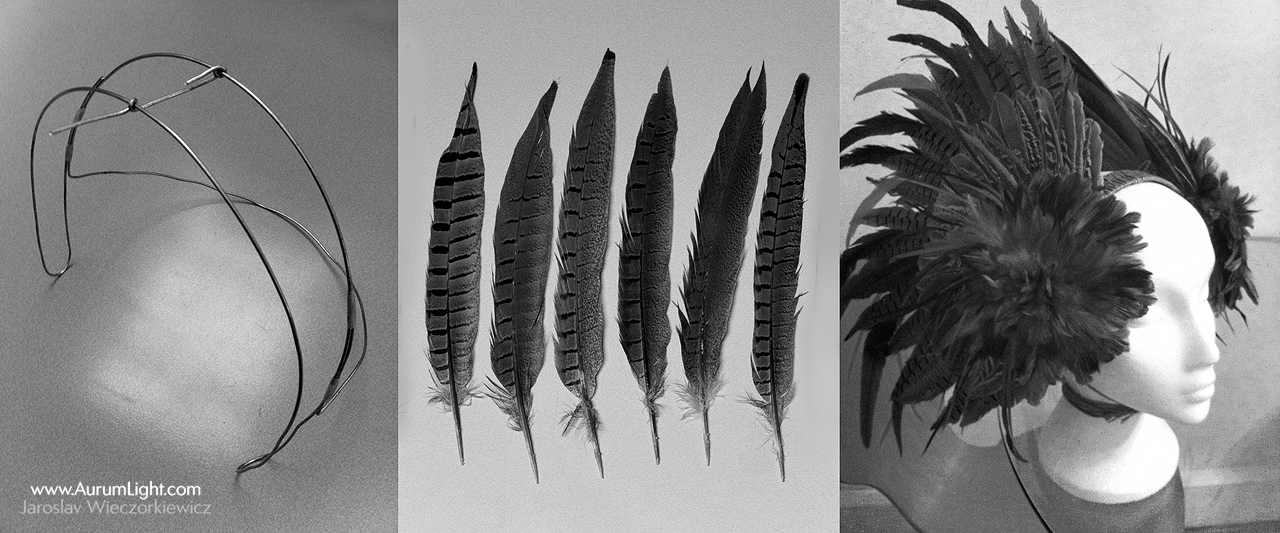
To endow our witch with flames I came up with alternative version of the costume.
I thought that feathers could successfully mimic a fire…
… it took me over 8hours to put this headpiece together. Taking under consideration that every single feather was glued individually I am happy with that mock-up.
.
To achieve a mentioned effect I decided to use a mixed lighting technique, where we will use a fast flash duration – for freezing the subject – with a modelling light as a continuous light source to burn the movement.
To complement the scene we used a photographic gel.
Here is a short video from the test shoot:
.
This technique has a really exciting potential! You can apply this effect to many different photography genres, like sports or bridal.
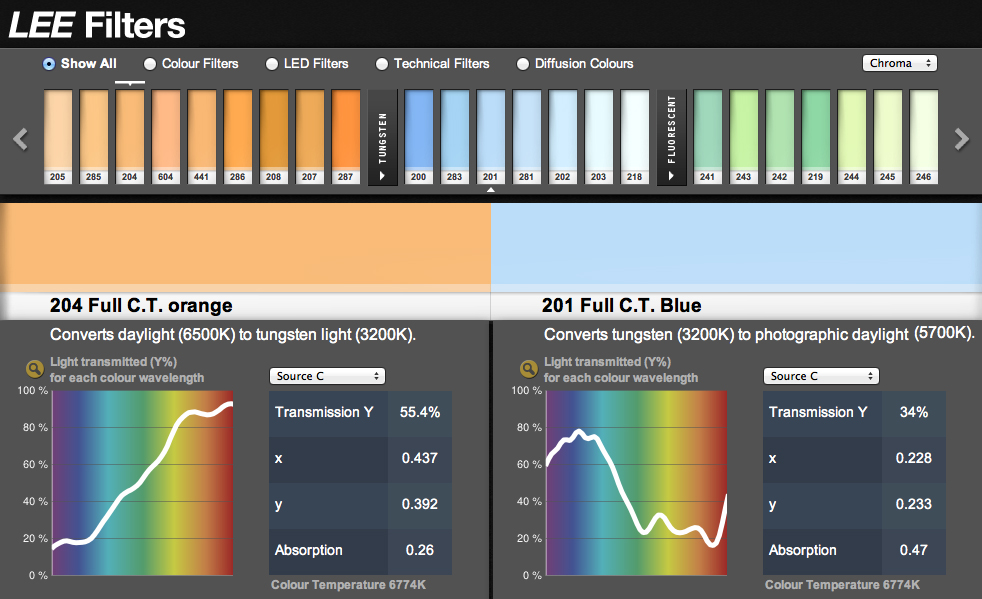
Knowing the basics on how to match the colour of your light sources i.e. flash – close to daylight white balance and continuous – tungsten is essential.
.

.
You can do that very precisely by using right correction gel from online colour charts:
.
To capture a burning light trail effect you need to take two more factors under consideration:
– a long exposure
– and movement

.
During over one second exposure, using for left rim light a continuous warm modelling light hitting models head and back, you can ask the model to move or just shake the camera…
You will need a few takes to get used to, but try to experiment because it is well worth the effort!
.
We will keep you posted about this and other projects, and hopefully soon we will set a date for the actual shooting day!
All the best
Jaroslav
—
MILK Workshops in AUSTRALIA 2013!
Book your place now, here: >>>BOOKING PAGE
BRISBANE Nov 23-24 2013
MELBOURNE Nov 27-28 2013
SYDNEY Nov 30-Dec 1 2013

.
My best regards
Jaroslav


18 Comments
A very good documentation of your photo shoot. Rarely see it that well made.
Świetne Jarku!
Great picture!
How do you attached green gel to the flash in octabox?
Thanks a lot for the great picture and explanations. All is so inspiring !!! Wishing you all the best in your projects
Very creative and inspiring work!
wow thank you for such a great tutorial on the magic you do
this is magic and very inspiring, great stuff
Dude, love the tutorials, especially the detail within. I ask myself where on earth do you get the time? :) Keep them coming!
Ther should be some contest for BTS – your work is amaizing !
Great tutorial! Very professional presentation…
Thank you for sharing.
thank you so much for the idea and technical tips.
@ Carlo, Piotr, ALexei, David, Colleen, Jimmy, Marcin, IVOlution, Felix
Many thanks for your comment!
@ Eric
Cheers Man! Good to see you here. Oh well, you know – who needs the sleep, right?
@ Mrakor,
With a little help from a Scotch tape. A3 sheet Gel was stitched to steel rods of Octa.
All the best
Jaroslav
Love the picture, looks really amazing.
Beautiful and very creative!
Everything about this is great! Looking forward to seeing this project develop. Can you tell us what color backdrop you used for this shot? Cheers!
Hi there!
Thanks for your comment and kind words!
The background was white.
Cheers
Jaroslav
AL, (confused face) If you had the shutter @ 1 second. Why was the models face not blurry only the feathers?
Because there is no ambient light falling on models face – the room is dark.
It is exposed and frozen in a very short moment by the flash burst.
Cheers
Jaroslav