THE TRIAL – How was it done?

The Trial – Calendar – Behind The Scenes

After publishing photographs from The Trial [ Click for Photos ], our recent conceptual shoot, I’ve received a lot of emails asking ”How was it done?” and “How on earth we managed to convince over 50 models to take part in the project!”

I will be more than happy to answer, but first I would like to thank you all for your messages and kind words, I really appreciate them all!

OK, So let’s get straight to the point!

Working around your limitation is what photography is all about really.

“Do you need a big budget to do big things..?”
– I don’t think so!

What matters is thinking outside the box and always willing to go the extra mile!

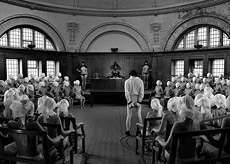
The Courtroom scene was the most challenging illustration.
We had no budget to hire over 50 models or the full house of lighting gear…

So instead I decided to Shoot in Sections.

I have prepared a little animation to give you a full understanding of what this involved:

The cameraPhase One!

For this kind of work, you want to have something which will justify the scale of your project.
And I knew I wanted the best possible output!

I decided to try the Phase One camera system, and to say that I am thrilled with the quality of the final images is not enough.
I worked with P65+ Digital Back  and I think that the resolution, quality and level of noise is just superb.
When your focus is in place you will get an extraordinary level of details and – to paraphrase my friend Drew – “the Angels sing!”

And that illustration when printed at almost 2m wide paper is just breathtaking!

[To Enlarge please click on the photo]

Now with the introduction of the new modelPhase One IQ180 Digital Back with over 80MP, and extraordinary quality and detail – they just rewrite the standards!

I hope to put my hands on the beast soon enough to shoot with it my new project – Awakening!

The Setup: Gitzo + Manfrotto

If you can manage to keep your camera locked dead tight on the tripod and keep the lighting consistent – it allows you to multiply not only models but also the lighting setups!

When working with such a camera – and the medium format is not a small body – and large groups of talents + team on the day , there are so many things around you that the least important thing to worry about is to secure the consistent output – you want to be sure that the rig keeps the frames identical.
For that you need to go for the sturdiest tripod which you can get.

We worked with Gitzo GT5660SCT Giant Tripod with a fantastic Manfrotto 405 Geared Head which allows for an absolute fine detail camera position adjustments.

To make sure you will not move anything while shooting – we tethered and operated the camera from a laptop via Phase One, Capture One software.

After all that… it is just as simple as layering final frames in Photoshop!

And other than that, there was almost no postproduction on the images.
You gotta love it, when it is all done in Camera!

Oh, and if you missed my previous post here is the complete Behind The Scenes Video from The Trial and the final photographs you can find here [click]:


Cheers
Jaroslav
www.AurumLight.com

—-

PART 1: THE TRIAL by AurumLight Studio

*** Workshops ***

MILK Workshops in AUSTRALIA 2013!
Book youplace nowhere: >>>BOOKING PAGE

BRISBANE Nov 23-24 2013
MELBOURNE Nov 27-28 2013
SYDNEY Nov 30-Dec 1 2013


.

My best regards
Jaroslav

AWAKENING – PART I – Finding Your Anchor Point


When working on a new concept, especially at the early stage I always look for something what will drive my idea, something that will provide ‘the Grip’, or what I call The Anchor Point.

It is not necessarily the most important part of the story, but it is a prominent enough element of the puzzle to give you a reference to work around it!

In some cases it might be your model, sometimes it is the location, but this time it is a prop – a part of our future set…

But let’s start where we left the Quest last time.

What we have managed to collect was a pile of pallets and a trampoline. Plus I’ve thrown in a few hard boards.

I know that it is not clear for you to see where we are going with this, and it’s because you haven’t seen the storyboard yet!

We will get to that too, but you don’t want to know the ending just yet… do you?

To build something, we had to dismantle all the elements…

… and this is how we made it happen.

This is what I had in mind:

… and that is what we came up with:

Obviously the pod is not finished yet. We will add more detail, but what we got is our ‘Anchor Point’!

Now when we have our central object – we know what size / kind of the space (indoor location) we need to find / prepare for the shoot.

From proportions and those references we can easily work out rest of the elements, look for props and move to another stage!

But more about that in the near future!

Please stay tuned, there is a lot more to come!

Cheers

Jaroslav

www.AurumLight.com

AWAKENING – PART I – Finding Your Anchor Point

AWAKENING – PROLOGUE – Seeing beyond the obvious…

AWAKENING – THE PHOTO-QUEST with AurumLight Team

Halloween: Trick or Treat !

so… Trick it is!

The Ghost:

It’s been a while since I last shared some of the Photoshop tricks and this is a great occasion to do that!

Here is the image I shot last year, the concept was a Deadly Dinner, and we have made a series of illustrations, the one below is one of them.
You can find the full story Here.

Let me take you through the Ghost Effect I used above.

First note is that like in case of our Liquid Illustrations all the elements were photographed on the same day with the same lighting, and camera locked on tripod.

This is essential to keep the right perspective and values when working on composite.

First step was to pick the right frame with Olya (on the left), Deona (on the right) and desaturate it.
The second step is a simple treatment of that layer with the GLOWING EDGES photoshop Filter.
Depends on your base frame sometimes it is good to bring back some of the details to our ghost figure!
I did that by adding the mask with a smoke pattern on it:

The final step is to add more smoke layers to create convincing fading effect.
I used simple black and white smoke photographs and placed them above our composite in SCREEN blending mode. To match your smoke layer and the ghost figure you will have to play a bit with the LIQUIFY filter or WARP transformation tool, and voila!

The Blood:

One of the downsides of this test shoot was that even though we had a fake blood we couldn’t use it on the day. So all the blood had to be done in postproduction.
So… how?

Here is the final frame of the Vampire:

and here is the Before and After:

We photographed the blood afterwards and just layered those frames over the original illustration using the MULTIPLY blending mode.
This example should help to understand the general idea:

;-)

The MULTIPLY blending mode helps you to match the different skin tones – you can always lift or tone down the brightness using the LEVELS in photoshop, then it is a simple matter of masking out the unwanted portion of the blood layer.

And here you can see a few more illustrations where I used the same technique:

Cheers
Jaroslav
www.AurumLight.com

AurumLight featured on Strobist.com

I am very pleased to let you know that, recently we have been featured on Strobist.com where I shared the story behind The Silver Angel illustration which become an Advert for PaulBuff Einstein E640!

If you haven’t seen the post already, you can find it here.

I would like to say hello and thanks to all who came along via David’s Blog and visited us here!
I hope you have found something for yourself and I assure you that there is more exciting stuff to come!

Last but not least, I was fortunate to meet David a few times and like everyone who had a chance to spend some time with him I was always inspired and encouraged to work even harder!
If you ever have a chance to go to one of his seminars just do it, you will love his approach and attitude!

… oh, and “click” ;-]

Cheers
Jaroslav
www.AurumLight.com

AWAKENING – PROLOGUE – Seeing beyond the obvious…

I always have in my sketchbook a minimum of three complete storyboards to choose from for my personal work or to show to a potential clients.
This time I decided that we once again will try to take things to another level and instead on just working on location within the location potential – we are going to build the whole set!

The theme is a Sci-Fi and it is going to be my tribute to all those creative individuals like Stanley Kubrick, James Cameron, Jodorowsky & Gimenes, Mamoru Oshii or Enki Bilal who were for years feeding my brain with all those amazing Sci Fi stories…

So you think… “yeah, big budget…” but my point is that the great things happen from great ideas, not necessarily from big money… and you may be surprised that “TheTrial” was made with a very small budget…
I tell you this – clients love it when you can build stuff out of literally “nothing” with almost “no budget”!

So…
In that moment when I am pressing the button and starting the creative process I see things differently and looking beyond the obvious… like in Wachowskis Brothers – Matrix…

And believe it or not – today we will start our Sci-Fi concept with a bunch of pallets and a garden trampoline that someone threw away and I found on my way home…
For most people they are rubbish for me it will become a main part of the whole photo-jigsaw! And I hope you will see that soon too ;-]

Please stay Tuned – More to come NEXT WEEK!
And feel free to hit us in the comment section to let us know WHAT YOU can actually see in the above photographs…

Remember > Free your mind… and the rest will follow !

Matrix: Seeing beyond the obvious…

Cheers
Jaroslav
www.AurumLight.com

AWAKENING – THE PHOTO-QUEST with AurumLight Team

Hi there,

I would like to thank everyone for such the great feedback on “TheTrial” concept shoot!
I wanted to let you know that if you think that we need some time to recover… I am more than happy to disappoint you Guys!

We are gearing up for my new SCI-FI concept – AWAKENING – and this time we have something Special for You!

.
We would like to take you on a Photographic QUEST and give you a sneak preview from start to finish!
You will have a chance to jump on board and be a part of making one of our biggest shoot to-date happen.

You will not only follow the whole process, but you are more than welcome to give us instant feedback and have an influence on the final effect!

Please subscribe to the Blog, and lets start THE PHOTO-QUEST together!

P.S. There is a ‘subscribe to blog’ option below the comments under each post.
Just tick the box: “Notify me of new posts via email”

Cheers
Jaroslav